Set up and Develop Selenium WebDriver Pytest Test Scripts with TestWise IDE
A step by step guide (with video) to create a test project for a Selenium+Pytest test script in TestWise IDE.
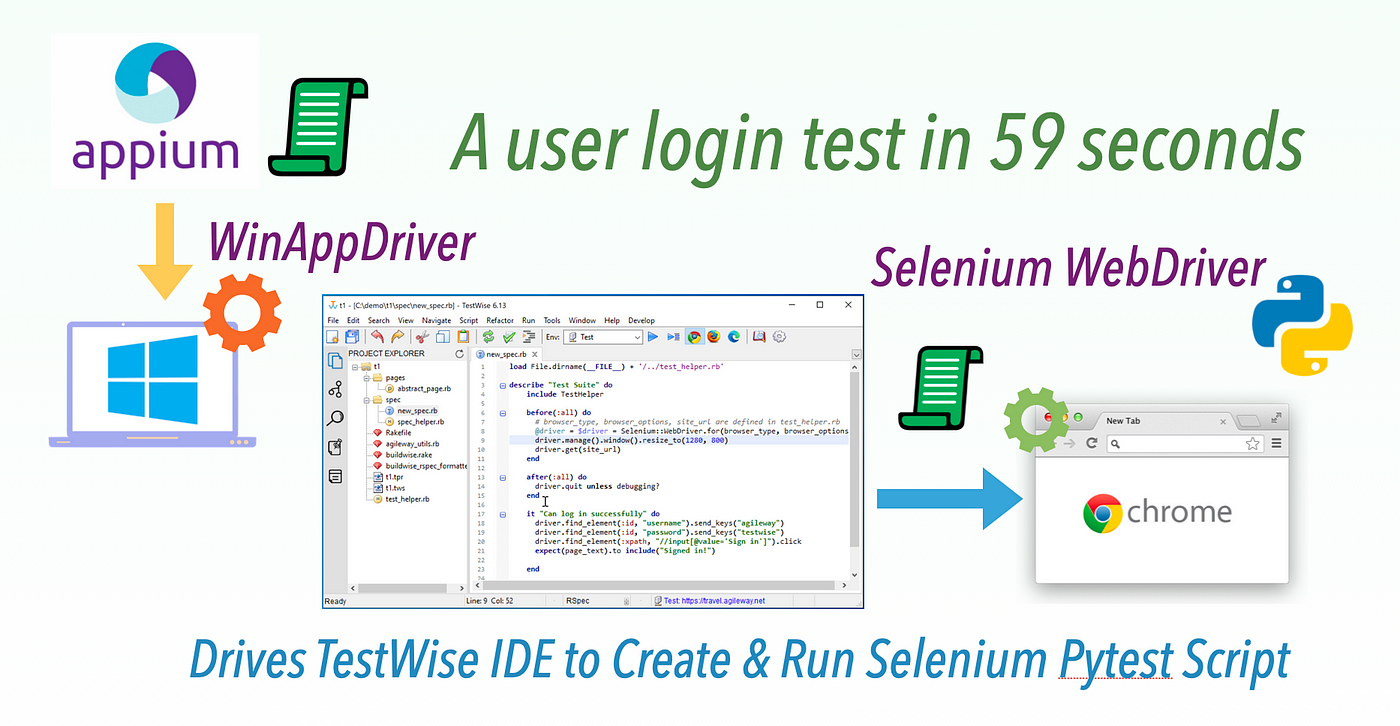
The video below uses an Appium + WinAppDriver script to:
- Launch the TestWise IDE.
- Create a new Selenium + Pytest test project in TestWise IDE.
- Script a complete user login test script.
- Execute the newly created Selenium test.
All within 59 seconds. (fully automated, no human intervention)
This article shows how you do it step by step.
1. Prerequisite: Install Python and Test libraries
Obviously, you need Python. Then, install the following libraries:
% pip3 install selenium
% pip3 install xmlrunner pytest faker
2. Verify Test Execution Setup
I have a habit of immediately verifying the operation. Execute the following commands in a terminal.
% cd
% git clone https://github.com/testwisely/buildwise-samples
If you don’t use Git (for version control), I highly encourage learning it, and it is quite easy to use. Check out the 10-Minute Guide to Git Version Control for Testers.
You will find a set of folders and files under ~/buildwise-samples . Go to that folder in your terminal. Then, in the same terminal window, run these two commands (one by one).
% cd buildwise-samples/e2e-pytest-selenium/tests
% pytest 01_login_spec.py
You shall see a Chrome browser open and run two test cases (within one test script file) in it.
3. Install TestWise IDE
Since the Selenium WebDriver Pytest scripts are Python files, you may use any programming editor, such as Visual Studio Code or Python-specific IDEs, such as PyCharm.
TestWise IDE is a Next-Gen Functional Testing IDE designed for E2E testing. I learned Test Automation with TestWise (Disclaimer: My father created TestWise). You may use TestWise in free mode with just minor constraints (relaunch the app after 15 test executions).
You may choose any tool to develop Selenium test scripts (in plain text). That’s the beauty of being open-source and in a well-known language.
Even if you are not using TestWise, I still encourage you to explore the test project structure that TestWise uses. It is simple and embraces the Maintainable Automated Test Design, which has been well-proven in many successful test automation projects. You can take advantage of the proven structure and supporting files (e.g. helper and page classes) even using a different testing tool.
4. Create a Test Project and your first Selenium RSpec test script in TestWise IDE.
TestWise uses the concept of ‘Project’ to confine the test scripts and supporting files.
1. Click menu ‘File’ > “New Project”.
Fill in the following information:
Project name: <any text>
Location: <an empty folder>
Automation Driver: Selenium-WebDriver
Test Script Syntax: Pytest
Website URL: <your website base URL>
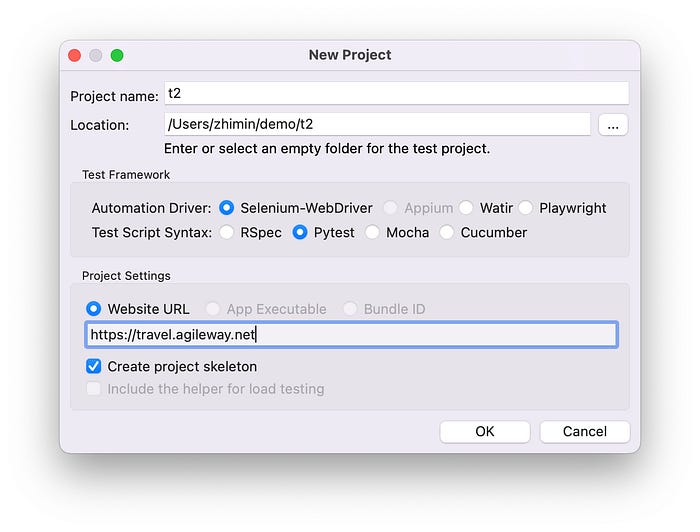
2. Click the “OK” button to create the test project.
Here is how the test project’s skeleton looks like in TestWise.
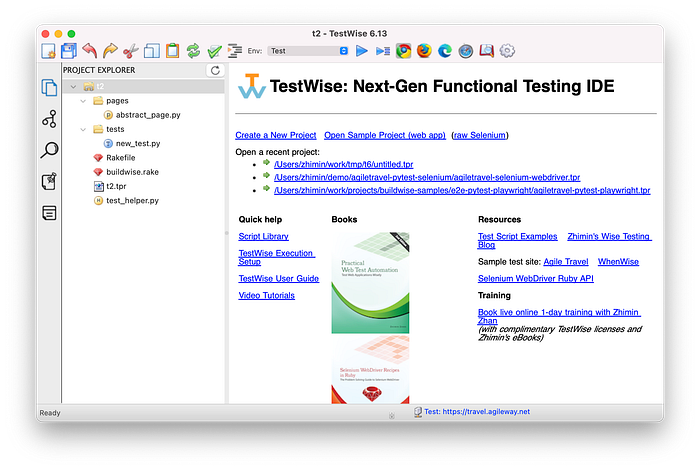
A brief explanation of the folder and files:
testsFolder:
Contains test script files in the format of XXX_test.pypagesFolder:
Contains the page classes (see Page Object Model), theabstract_page.pyis already created.test_helper.py
Shared test helper (see Maintainable Automated Test Design)Rakefile&buildwise.rake
For integrating with the BuildWise CT Server.XXX.tprFile
TestWise project file.
5. Create your first Selenium RSpec test in TestWise IDE.
Now, let’s create a raw Selenium RSpec test script quickly in TestWise.
3. Run the empty test script
Click new_test.py (in the PROJECT EXPLORER pane on the left) to open in an editor.
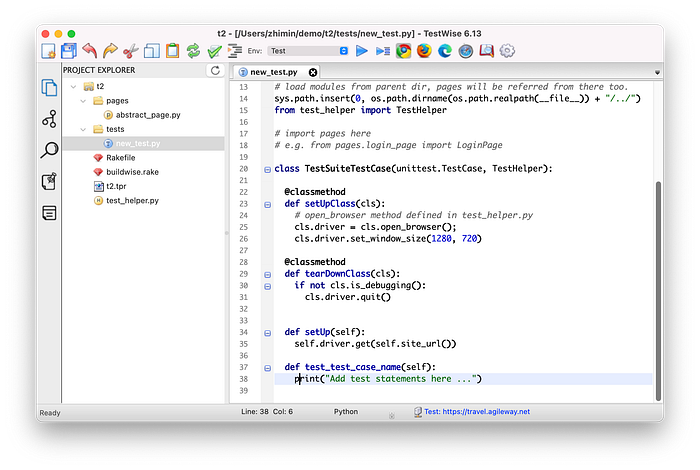
Right-click any line in the test case def test_test_case_name(self): and select “Run “Test Case Name”” to run this individual test case.
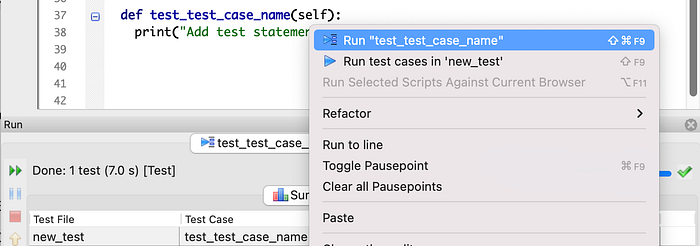
You shall see a Chrome browser launch, open our target website and leave it open.
“Leaving the browser open” is a very useful feature in developing web test scripts. For more, check out this article, Innovative Solution to Test Automation: Keep the Browser Open after Executing an Individual Test.
4. Write test statements in TestWise.
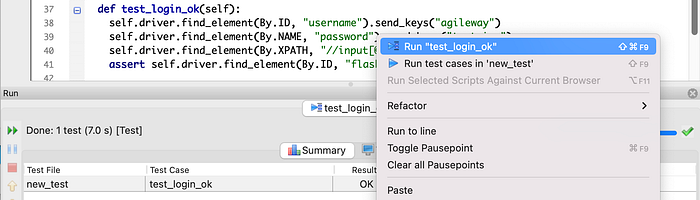
By inspecting the page (right-click the page in Chrome and select ‘Inspect’), I have identified the locator for the controls on the page, such as “#username”, “#password”, and “//input[@value=‘Sign in’]”.
In the login example, the first Selenium statement is:
self.driver.find_element(By.ID, “username”).send_keys(“agileway”)
We can type it character by character, but there is a more efficient way (see video above): Snippets. Snippets are quick shortcuts (expanded to an actual statement by the Tab key).
Type self. and dfei followed by a Tab key, which expands to driver.find_element(By.ID, “<CURSOR MOVES HERE and id is selected>”). Type "username" and Tab to go to the end of the line. Then, use the .sk snippet to expand to .send_keys("<CURSOR>"). Finally, enter the text you want to send, "agileway"and Tab to complete.
Using snippets is much easier than explaining, see it in action in the video above.
Repeat a similar process for the remaining test steps. Then finish by adding an assertion step. (tip: try the exp and dfex snippets)
5. Write test statements in TestWise.
This is only an introductory guide. There are many more handy TestWise features that can improve your productivity, such as “Run selected steps against the current browser” and “Functional Test Refactoring”.
6. A Complete Test Script using Helper and Page Object Models.
import unittest
import xmlrunner
import time
import datetime
import sys
import os
from selenium import webdriver
from selenium.webdriver.support.ui import Select
from selenium.webdriver.common.by import By
from selenium.webdriver.support.ui import WebDriverWait
from selenium.webdriver.support import expected_conditions as EC

# load modules from parent dir, pages will be referred from there too.
sys.path.insert(0, os.path.dirname(os.path.realpath(__file__)) + "/../")
from test_helper import TestHelper

# import pages here
# e.g. from pages.login_page import LoginPage

class TestSuiteTestCase(unittest.TestCase, TestHelper):

  @classmethod
  def setUpClass(cls):
    # open_browser method defined in test_helper.py
    cls.driver = cls.open_browser();
    cls.driver.set_window_size(1280, 720)

  @classmethod
  def tearDownClass(cls):
    if not cls.is_debugging():
      cls.driver.quit()


  def setUp(self):
    self.driver.get(self.site_url())

  def test_login_ok(self):
    self.driver.find_element(By.ID, "username").send_keys("agileway")
    self.driver.find_element(By.NAME, "password").send_keys("testwise")
    self.driver.find_element(By.XPATH, "//input[@value='Sign in']").click()
    assert self.driver.find_element(By.ID, "flash_notice").text  == "Signed in!"
The above script works, but is hard to maintain. We shall refactor it based on the Maintainable Automated Test Design .
Here I show the refactored version, using Page Object Model.
  def setUp(self):
    self.driver.get(self.site_url())

  def test_sign_in_failed(self):
    # ...
    login_page = LoginPage(self.driver)
    login_page.enter_username("agileway")
    login_page.enter_password("badpass")
    login_page.click_sign_in()
    # self.assertIn("Demo Fail this test case", self.driver.find_element_by_tag_name("body").text)

  def test_sign_in_ok(self):
    # ...
    login_page = LoginPage(self.driver)
    login_page.enter_username("agileway")
    login_page.enter_password("testwise")
    login_page.click_sign_in()
View the complete test scripts and a few others on this Github repository.
